From time to time pops up in the FPGA/Vivado community discussions on how to structure projects for version control. I’ve seen some methods that, IMHO, are not the best approach: they add the project’s generated files to the repository.
We’ll take another approach. This post is about scripting an IP from TCL and HDL sources to be kept in a repository. In the second part of this series, I’ll talk about generating an entire Vivado project from sources.
Keep in mind there are other ways to get the job done. But I’ve been using this flow for at least four years with good results. Feel free to adapt to your needs.
Prerequisites
For this post, we’ll be using Vivado 2020.2. The source code used here is available at:
https://github.com/lucasbrasilino/axis_exec_op
And, yes, please consider starring the repository. ;-)
IP file organization
Our example IP is called axis_exec_op. Its job is to apply some operation over 32-bit words delivered to an AXI4 Stream slave interface. Then, the result is sent out through an AXI4 Stream master interface.
The IP files are organized in three directories:
- The IP top directory, which name matches the IP:
axis_exec_op; - A directory for the TCL script named
tcl; - A directory for HDL files named, surprise surprise,
hdl.
Here goes the directory structure:
1
2
3
4
5
6
7
8
9
10
11
12
$ tree axis_exec_op/
axis_exec_op/
├── hdl
│   ├── axis_exec_op.sv
│   ├── axis_exec_op_wrapper.v
│   ├── easyaxil_out.v
│   ├── fallthrough_small_fifo_v2.v
│   └── small_fifo_v3.v
├── Makefile
└── tcl
    ├── axis_exec_op.tcl
    └── metadata.tcl
A Makefile is available in the top directory for helping us executing vivado and cleaning up generated/log files.
TCL scripts
As you can see from above, there are two TCL scripts. The metadata.tcl sets global variables, and the axis_exec_op.tcl creates the IP project, sets properties, and does the packaging.
metadata.tcl
The content of metadata.tcl is:
1
2
3
4
5
6
7
8
9
10
11
12
13
14
15
16
17
18
19
20
21
22
23
24
25
26
27
28
29
30
31
32
33
34
35
36
set design "axis_exec_op"
set top "${design}_wrapper"
set proj_dir "./ip_proj"

set ip_properties [ list \
    vendor "lucasbrasilino.com" \
    library "AXIS" \
    name ${design} \
    version "1.0" \
    taxonomy "/AXIS_Application" \
    display_name "AXIS Op Execution" \
    description "Executes an operation over AXI4-Stream" \
    vendor_display_name "Lucas Brasilino" \
    company_url "http://lucasbrasilino.com" \
    ]

set family_lifecycle { \
  artix7 Production \
  artix7l Production \
  kintex7 Production \
  kintex7l Production \
  kintexu Production \
  kintexuplus Production \
  virtex7 Production \
  virtexu Production \
  virtexuplus Production \
  zynq Production \
  zynquplus Production \
  aartix7 Production \
  azynq Production \
  qartix7 Production \
  qkintex7 Production \
  qkintex7l Production \
  qvirtex7 Production \
  qzynq Production \
}
As you can see it assign values to variables that affect the IP, such as the supported Xilinx FPGA families.
The ip_properties list holds data used by Vivado IP Integrator(IPI) to identify, search, and display information about your IP. Here you might see something already familiar. Vivado uses a unique Version-Library-Name-Version(VLNV). From the example, the VLNV is set using variables vendor, library, name, and version. Thus, it will be lucasbrasilino.com:AXIS:axis_exec_op:1.0.
axis_exec_op.tcl
The file axis_exec_op.tcl is the main script, and its content is:
1
2
3
4
5
6
7
8
9
10
11
12
13
14
15
16
17
18
19
20
21
22
23
24
25
26
27
28
29
30
31
32
33
34
35
36
37
38
# Source metadata
source ./tcl/metadata.tcl

# Create project
set ip_project [ create_project -name ${design} -force -dir ${proj_dir} -ip ]
set_property top ${top} [current_fileset]
set_property source_mgmt_mode All ${ip_project}

# Read source files from hdl directory
set v_src_files [glob ./hdl/*.v]
set sv_src_files [glob ./hdl/*.sv]
read_verilog ${v_src_files}
read_verilog -sv ${sv_src_files}
update_compile_order -fileset sources_1

# Package project and set properties
ipx::package_project
set ip_core [ipx::current_core]
set_property -dict ${ip_properties} ${ip_core}
set_property SUPPORTED_FAMILIES ${family_lifecycle} ${ip_core}

# Associate AXI/AXIS interfaces and reset with clock
set aclk_intf [ipx::get_bus_interfaces ACLK -of_objects ${ip_core}]
set aclk_assoc_intf [ipx::add_bus_parameter ASSOCIATED_BUSIF $aclk_intf]
set_property value M_AXIS:S_AXIS:S_AXI $aclk_assoc_intf
set aclk_assoc_reset [ipx::add_bus_parameter ASSOCIATED_RESET $aclk_intf]
set_property value ARESETN $aclk_assoc_reset

# Set reset polarity
set aresetn_intf [ipx::get_bus_interfaces ARESETN -of_objects ${ip_core}]
set aresetn_polarity [ipx::add_bus_parameter POLARITY $aresetn_intf]
set_property value ACTIVE_LOW ${aresetn_polarity}

# Save IP and close project
ipx::check_integrity ${ip_core}
ipx::save_core ${ip_core}
close_project
file delete -force ${proj_dir}
Note the -sv option on the second read_verilog command. That instructs Vivado the file is a SystemVerilog code. If your IP is written in VHDL, you must use the command read_vhdl instead.
One important action you must pay attention is to associate AXI and AXI-Stream interfaces and reset signal to clock done by lines 23 to 27. That will save you a lot of trouble when validating the block design in IPI. With the association, Vivado will automatically infer the interface’s FREQ_HZ parameter with the clock upon validation and also update it when you change the clock frequency. You will avoid problems like this.
Vivado can infer what type of interface or port an IP has based on their name as you can see in the UG1118. In our IP, the reset port aresetn should be correctly inferred. However, I’ve added the commands from lines 30 to 32 to illustrate how you can force the polarity of a reset port.
Importing source files to a version control system
After the IP directory structure is created and in place, we can import its files to a version control system. In this example, I’m using git. I’m supposing the remote repository was created, git init was executed in the top directory, and the remote was properly configured.
You just need to execute:
1
2
3
4
5
$ git add Makefile
$ git add tcl/*
$ git add hdl/*
$ git commit -am "initial import"
$ git push origin master
Packaging the IP
To package the IP, we need first to source Vivado’s configuration. In my system I execute:
1
$ source /opt/Xilinx/Vivado/2020.2/settings64.sh
Then, we just need to run make on the IP’s top directory:
1
$ make
If everything goes ok, you might have a component.xml file at the top directory:
1
2
$ ls
component.xml  hdl  ip_user_files  Makefile  tcl  vivado.jou  vivado.log  xgui
The IP is ready for being used by Vivado’s IPI.
Using the IP
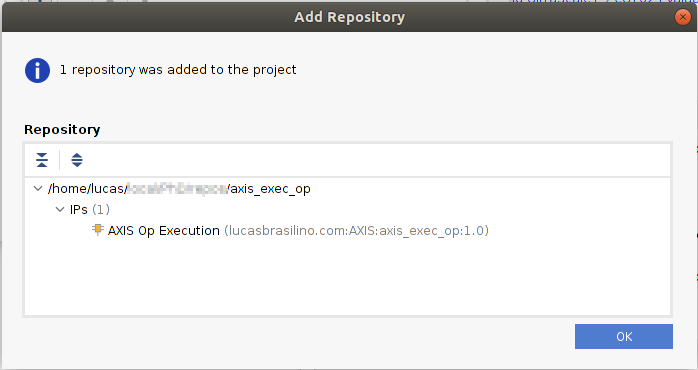
To use our example IP, we need to tell Vivado the top directory is an IP repository. That is all. So, start Vivado and create (or open) a project. In the Flow Navigator, click on Settings, expand IP, click on Repository, click on the + button and select the IP’s top directory, and click Select. The following window should appear:

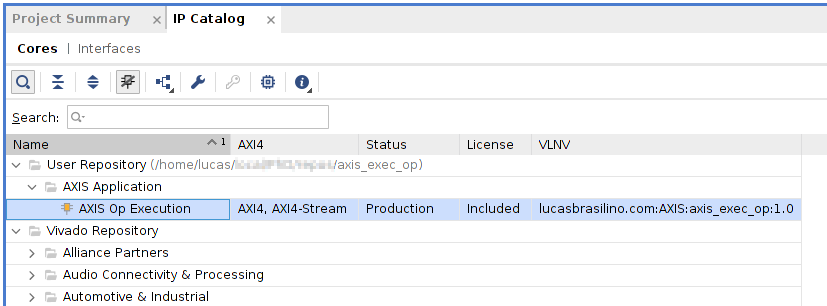
Then click on Ok, and Ok again. Clicking on IP Catalog, the IP should be shown:

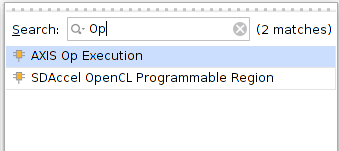
You can now create a block design and instantiate the IP. Click in Create Block Design, then Ok. Click on the block design canvas and press Ctrl+i to instantiate an IP. Search for Op and you should be able to find it:

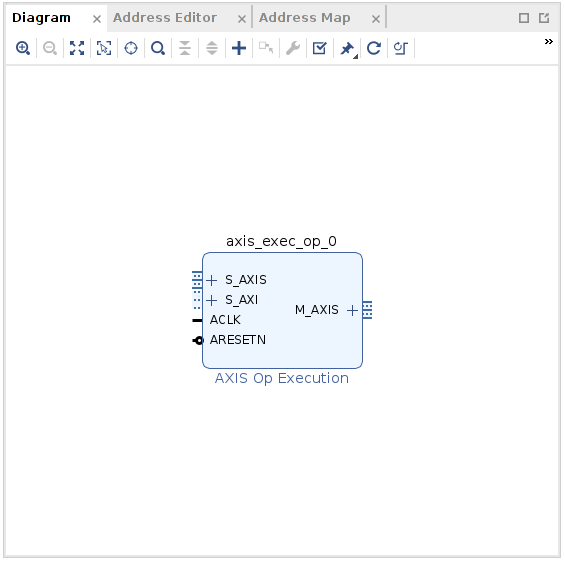
After instantiation, the IP should be available in the block design:

I script Vivado project as well. The second part of this series will discuss how to integrate this flow with a complete project, so simply running make all necessary IPs plus project are generated.
Conclusion
In this post, we discussed how to organize the source code of an IP aiming to keep it on a version control system. In the second part of this series, we’ll discuss how to script and generate an entire IP-based Vivado project from sources, also for version control.