If you worked on large Petalinux projects, you’ve probably figured out that it’s cumbersome to add additional software other than those available on its pre-defined root filesystem (rootfs) image. Don’t get me wrong! Petalinux rootfs is great when you are bundling an embedded system ready for deployment on the field: it is small, lightweight and optimized for your solution. But if you work on research (or R&D), and you need to experiment with different libraries, tools, and even compiler versions. In that case, Petalinux rootfs becomes a major hindrance. Try to compile the newest OpenMPI or the newest GCC using Petalinux rootfs and you’ll get my point.
Why not use Debian that provides more than 57703 packages ready to go ? Even better, it is way easier to integrate the newest software to your embedded system using it than the Petalinux rootfs. There are out there some Ubuntu-based rootfs as well, but I’ve found these images come and go. Looks like there’s no community maintaining/updating them. Fear not!! The steps covered here can also be used to generate Ubuntu rootfs, provided that minor changes are made, like distribution name and URL.
In this post, we’ll explore how to create custom rootfs based on Debian combined with the Petalinux Kernel to have a full system booted in a Zynq Ultrascale+ MPSoC board.
Although the procedure here was tested using the ZCU102 board, it might help you on creating an image to be used in boards like the KRIA K26 SoM, Zynq UltraScale+ RFSoC’s ZCU111, and many others.
Prerequisites
For this post, we’ll be using Petalinux 2020.2. The method described here might work with other versions of Petalinux as well. I’m using Ubuntu 18.04 since Petalinux tools support it, which is necessary to compile the Kernel.
Setting up a SDCard
For this example, we’ll be using an SDCard to hold the BOOT and ROOTFS partitions. The boot partition is a FAT32 filesystem where the BOOT.IMG, image.ub and boot.src files. BOOT.IMG contains the early code necessary to start the Zynq MPSoC up, such as the Platform Management Unit (PMU) firmware, the First Stage Boot Loader (FSBL), the Arm Trusted Firmware (ATF), the u-boot OS loader, and an optional bitstream for the Programmable Logic (PL, or FPGA if you will :) ). The image.ub is a Flattened Image Format file containing the Linux kernel, device tree, and optionally a ramdisk image, among other things, ready for u-boot. The ROOTFS partition will be formatted in Ext4.
Creating partitions
Here I will be using an 8GB SDCard, just because that’s what I have on hand. Usually, the generated Debian rootfs I’ve done does not get larger than 1 GB. In my system, the SDCard was detected as /dev/sdb. In your system it may be detected as another device, such as /dev/sdc. I like to run dmesg right after plugging the SDCard in the system to check how it was detected. You might use lsblk as well.
Using fdisk, we’ll create a 256MB partition for BOOT, set it as bootable, and use the remaining space for ROOTFS:
1
2
3
4
5
6
7
8
9
10
$ sudo fdisk /dev/sdb

Command (m for help): n
Partition type
   p   primary (0 primary, 0 extended, 4 free)
   e   extended (container for logical partitions)
Select (default p): p
Partition number (1-4, default 1):
First sector (2048-15130623, default 2048):
Last sector, +sectors or +size{K,M,G,T,P} (2048-15130623, default 15130623): +256M
And toggle partition 1 to FAT32:
1
2
3
4
5
6
7
8
9
Command (m for help): t
Selected partition 1
Hex code (type L to list all codes): b
Changed type of partition 'Linux' to 'W95 FAT32'.

Command (m for help): a
Partition number (1,2, default 2): 1

The bootable flag on partition 1 is enabled now.
Then we create the second partition:
1
2
3
4
5
6
7
8
9
10
Command (m for help): n
Partition type
   p   primary (1 primary, 0 extended, 3 free)
   e   extended (container for logical partitions)
Select (default p): p
Partition number (2-4, default 2):
First sector (526336-15130623, default 526336):
Last sector, +sectors or +size{K,M,G,T,P} (526336-15130623, default 15130623):

Created a new partition 2 of type 'Linux' and of size 7 GiB.
And write all changes to the SDCard:
1
2
3
4
Command (m for help): w
The partition table has been altered.
Calling ioctl() to re-read partition table.
Syncing disks.
You can check if partitions were created with:
1
2
3
4
5
6
7
$ sudo fdisk -l /dev/sdb

[...]

Device     Boot  Start      End  Sectors  Size Id Type
/dev/sdb1  *      2048   526335   524288  256M  b W95 FAT32
/dev/sdb2       526336 15130623 14604288    7G 83 Linux
Formatting partitions
Now we can format each partition. I recommend labeling them, so we can use their labels to reference partitions when configuring mount-points. That is more flexible than using filesystem UUIDs, for example.
1
$ sudo mkfs -t vfat -n BOOT /dev/sdb1
1
$ sudo mkfs -t ext4 -L ROOTFS /dev/sdb2
Creating a Debian rootfs
Here is where things start to become interesting. Debian (and Ubuntu) distribution provides the qemu-debootstrap tool intended to create a rootfs to be used in virtual machines. qemu-debootstrap runs the well-known debootstrap, used for ages to bootstrap a minimal system, plus a second stage for completing the bootstrap process.
qemu-debootstrap is provided by the qemu-user-static package. To install it plus debootstrap, run:
1
$ sudo apt install debootstrap qemu-user-static
An optional step is to install the debian-archive-keyring package for package validation:
1
$ sudo apt install debian-archive-keyring
The trick here is to create an arm64 image, which is the ARM Cortex-A53 CPU architecture inside the Zynq Ultrascale+ MPSoC. Since debootstrap creates a bare minimum system, I will go ahead and provide some additional packages to be installed at this time. You can specify the list of packages you want.
1
$ sudo qemu-debootstrap --arch=arm64 --include=build-essential,autotools-dev,git,sudo,net-tools,python3,nfs-common,openssh-server,tcpdump buster /mnt http://ftp.us.debian.org/debian
And wait for a while….
At the end of the process, you should see something like:
1
2
3
4
5
[...]
I: Configuring tasksel...
I: Configuring libc-bin...
I: Configuring systemd...
I: Base system installed successfully.
Done! Your Debian rootfs is created. But before we go to Kernel compilation, let’s do two more small configurations.
Setting root password
The following command may be used to set up a password for root superuser. Replace the yoursecurepassword password for any you may find fit:
1
$ sudo bash -c "echo 'root:yoursecurepassword' | chpasswd -c SHA512 -R /mnt"
Enabling serial console for root login
Besides ssh to the board, you also may find it useful to log in using the board’s serial console, which usually comes up as /dev/ttyPS0. So, you might add the serial console to the securetty file to allow root login on it:
1
$ sudo bash -c "sed -i '4 i\ttyPS0' /mnt/etc/securetty"
Setting up Petalinux Kernel image and BOOT.IMG for booting from SDCard
The procedure to create a Petalinux Kernel image and BOOT.IMG file to mount the SDCard as rootfs is well documented in the Petalinux documentation. Here I suppose you already have a Petalinux project created. I will only go through to make the Petalinux kernel mount the rootfs from SDCard.
Once in your Petalinux project directory, run petalinux-config to configure it for mounting the SCard partition as rootfs:
1
$ petalinux-config
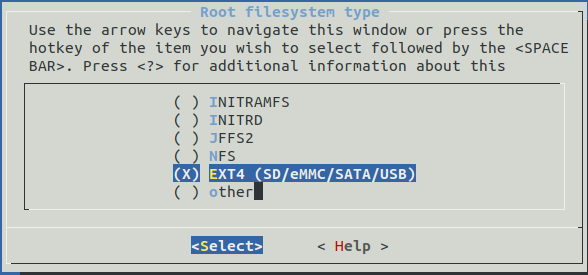
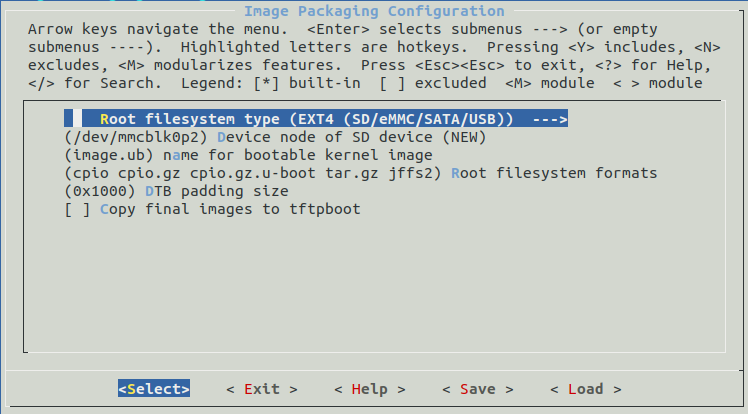
Go to Image Packing Configuration -> Root filesystem type and choose EXT4 (SD/eMMC/SATA/USB).
After that, make sure that /dev/mmcblk0p2 is the device selected in Device node of SD device:
Then exit and build your project:
1
$ petalinux-build
Generate the BOOT.IMG file and copy it along with the boot.src and image.ub files to the SDCard, in the first partition (the partition we labeled as BOOT).
1
2
3
4
5
6
$ sudo umount /mnt
$ sudo mount -L BOOT /mnt
$ petalinux-package --boot --u-boot --fsbl images/linux/zynqmp_fsbl.elf --pmufw images/linux/pmufw.elf --fpga images/linux/system.bit
$ sudo cp images/linux/{BOOT.BIN,image.ub,boot.src} /mnt
$ sudo umount /mnt
$ sudo eject /dev/sdb
Your SDCard is now ready to boot the board. Power off it and make sure the board is configured to boot from SDCard. Refer to board documentation about this setup.
Connect your system to the board’s USB UART, open a terminal program of your choice, and power on the board. At the end you’ll be able to login:
1
2
3
4
5
6
7
8
9
10
mlsa login: root
Password:
Linux mlsa 5.4.0-xilinx-v2020.2 #1 SMP Sun May 23 21:58:11 UTC 2021 aarch64

The programs included with the Debian GNU/Linux system are free software;
the exact distribution terms for each program are described in the
individual files in /usr/share/doc/*/copyright.

Debian GNU/Linux comes with ABSOLUTELY NO WARRANTY, to the extent
permitted by applicable law.
Running lscpu you’ll get:
1
2
3
4
5
6
7
8
9
10
11
12
13
14
15
16
17
root@mlsa:~# lscpu
Architecture:        aarch64
Byte Order:          Little Endian
CPU(s):              4
On-line CPU(s) list: 0-3
Thread(s) per core:  1
Core(s) per socket:  4
Socket(s):           1
Vendor ID:           ARM
Model:               4
Model name:          Cortex-A53
Stepping:            r0p4
CPU max MHz:         1199.9990
CPU min MHz:         299.9990
BogoMIPS:            199.98
Flags:               fp asimd aes pmull sha1 sha2 crc32 cpuid
root@mlsa:~#
Depending on your Petalinux project configuration, the Gigabit Ethernet interface, which is directly connected to the Processing System (PS) will be available:
1
2
3
root@mlsa:~# ip link show eth0
4: eth0: <BROADCAST,MULTICAST> mtu 1500 qdisc noop state DOWN mode DEFAULT group default qlen 1000
    link/ether 00:0a:35:00:22:01 brd ff:ff:ff:ff:ff:ff
You may configure its network in order to have access to the entire Debian repository.
Conclusion
In this post, we went through the process of creating custom Debian rootfs for a Zynq Ultrascale+ MPSoC board. We’ve used the ZCU102, however, the same process will probably work on other boards as well. With a similar procedure you can also create an image for Zynq-7000 based board, just use the armhf architecture, instead of arm64.